Table of contents
Author

In a recent blog post about the Belgian itsme®, we explored its versatile use cases, seamless onboarding process, and user-centric design.
Today, we’ll look at integrating itsme® with Auth0.
So, if you're interested in seamlessly incorporating itsme® logins into your Auth0 application, keep reading! You’ll see just how easy the process is with Criipto Verify.
3 steps to configure itsme® logins
Connecting itsme® with Auth0 through Criipto Verify takes 3 steps:
- Create a new application for your Auth0 tenant in Criipto Verify.
- Add a new connection for itsme® in your Auth0 application.
- Integrate your web or mobile application with Auth0.
1. Create a new application for your Auth0 tenant in Criipto Verify
First, you’ll need to create a new application in Criipto Verify.
From the Applications section of your Criipto Dashboard, click Add Login Application.
Configure the application details and choose Auth0 in the technology selector by picking Intermediary -> Auth0. (This will take you to the dedicated integration guide right after the application is created.)
Click “Create Application”.
You’ll see an auto-generated Client secret for your application. Save it for future use.

You will need the following information from your Application to integrate with Auth0:
- Client ID to identify your Auth0 tenant to Criipto Verify. (For example, urn:criipto:samples:itsme)
- Domain on which you’ll communicate with Criipto Verify. (We will use samples.criipto.id)
- Client secret is needed if you choose the Back Channel approach (recommended).
Configure the OAuth2 code flow
If you selected Auth0 as the technology, the OAuth2 code flow will be enabled by default, so you can can skip this section.
We strongly recommend keeping the OAuth2 code flow for security reasons.
If not enabled by default, you can configure the OAuth2 code flow from the OpenID Connect tab of your Application. You’ll need to:
- Enable OAuth2 code flow.
- Copy the generated client secret.
- Set the user info response strategy to plainJson to enable retrieval of plain JSON user information from the /oauth2/userinfo endpoint.
Please be aware that the value of the client secret will be displayed only once, during this initial setup. Criipto stores the client secret in a hashed format, making it impossible to retrieve the original value once it has been generated and stored.
2. Add a new enterprise connection for itsme® to your Auth0 application
Go to your Auth0 and create a new application (or use an existing one).
Once you’ve done so, you’re ready to add a new OpenID Connect Enterprise Connection. This will establish communication between Auth0 and Criipto Verify.
To configure the connection, we’ll use the following metadata endpoint:
https://samples.criipto.id/dXJuOmdybjphdXRobjppdHNtZTphZHZhbmNlZA==/.well-known/openid-configuration
where samples.criipto.id is our test domain at Criipto, and dXJuOmdybjphdXRobjppdHNtZTphZHZhbmNlZA== specifies the Beligian itsme®(advanced) as the login method.
Let’s pause for a moment to consider why we use this format.
Typically, one can use the 'acr_values' parameter to specify which eIDs are being requested in the /authorize request to Criipto Verify. But Auth0 doesn't pass 'acr_values' to Criipto Verify, so we’ll need a new Auth0 connection for each eID we need to integrate.
In this case, we can use a login-method-specific metadata endpoint: the OpenID Connect discovery endpoint with the syntax above. This endpoint holds an encoded version of the "raw" value normally contained in the acr_values. For Belgian itsme® Basic, the acr_values parameter is urn:grn:authn:itsme:advanced, which is encoded as dXJuOmdybjphdXRobjppdHNtZTphZHZhbmNlZA== in base64.
When configuring a connection for itsme® in Auth0 down the line, we will use this metadata endpoint as the Issuer URL.
If we need to integrate other eIDs into our application, we can omit the base64-encoded value and select the relevant eIDs from the Criipto Dashboard directly (by going to Application -> e-IDs). Otherwise, we can create a separate metadata endpoint (and a new OpenID Connect enterprise connection) for each eID we intend to use.
See our full documentation for the list of supported eIDs and their corresponding acr_values. We also have a dedicated blog post where we integrate Auth0 with the Norwegian BankID.
Creating an OpenID Connect connection with itsme®
*The steps below are accurate at the time of writing and are based on the dedicated section of Auth0 documentation on creating an Open ID Connect Enterprise Connection.
On your Auth0 dashboard, go to Authentication, then Enterprise.
- Select OpenID Connect and create a new connection.
- Enter the Connection name you’d like to use (e.g. “Criipto” or “itsme”).
- Under Issuer URL, enter the login-method specific URL, as discussed above: https://samples.criipto.id/dXJuOmdybjphdXRobjppdHNtZTphZHZhbmNlZA==/.well-known/openid-configuration. (Remember to use your own domain in place of samples.criipto.id.)
- Under Client ID, enter the Client ID/Realm from your Criipto Verify application.
- Copy the Callback URL. Switch to your Criipto dashboard, and paste the Callback URL from Auth0 into your Criipto Verify application under Callback URLs.
- Go back to Auth0 and click the Create button.
- After the application is created, choose Front Channel or Back Channel as a Type (depending on how you intend to integrate it with your application). You should only choose Front Channel if you are developing a pure Single Page Application. Otherwise, choose Back Channel. If you choose Back Channel, enter the Client Secret generated by Criipto Verify.
- Save changes.
Make sure to enable the created connection for your Auth0 application. You can do this from the Applications tab of the connection you just created or directly from your Auth0 application.
Mapping Criipto claims to Auth0 claims
After you enable the connection, standard claims provided by Criipto via itsme® will become available in Auth0 User Profile by default. Standard claims include basic user information such as name and birthdate.
If your application requires additional details such as a physical address, email, phone number, or national registration number, you can request these from your users during the login process. Then, you can include them as custom claims in the Auth0 ID token.
In our previous blog post on mapping eID claims with Auth0 Actions and Rules, you’ll find a detailed guide with steps to configure claims mapping in two ways. Since Rules will become legacy in November 2024, we’ll rely on Actions in this tutorial.
As of September 2023, the top-level event.user attributes added by external Identity Providers were not accessible in the Actions code. We’ll therefore use a workaround and integrate a custom Action with the Management API to look up the User Profile.
Adding custom claims for address and national registration number (nationalnumber)
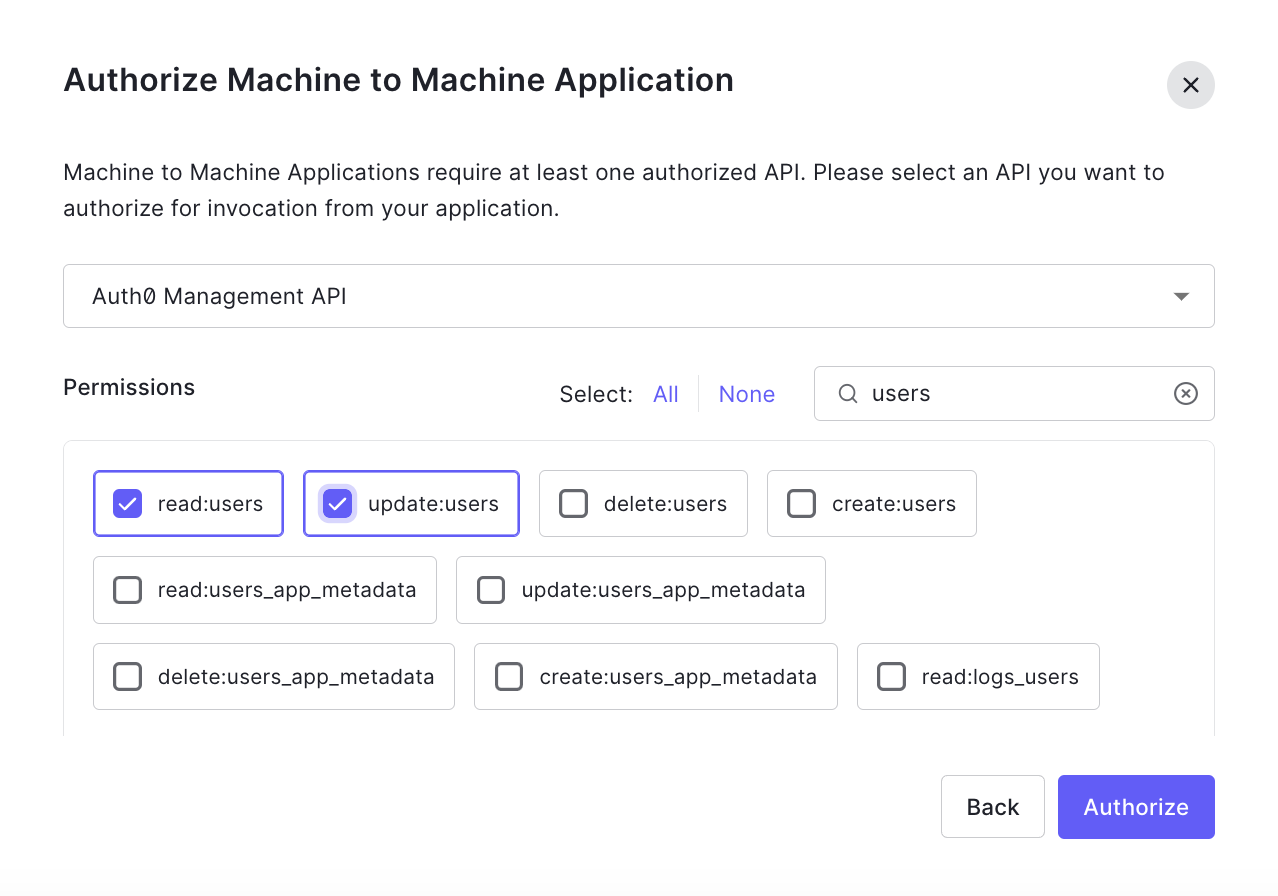
1. To configure the Management API, create and authorize a Machine to Machine Application for the Action.
2. Authorize it to use the Management API with the required scopes. We'll need Read:users and update:users.
3. From the Actions > Library tab, create a new custom Action with the Login / Post Login trigger.

4. Store the application’s credentials in the Action’s event.secrets object. You can find the domain, client ID, and client secret in the Settings tab of the Machine to Machine Application created in Step 1.

5. Add the latest version of the auth0 npm module(4.0.1 at the time of writing).

6. Add your Action code. Initialize and use the Management API client in the Action to access the User Profile. Then add custom claims.
To retrieve the user’s national registration number and address with itsme®, the code will look like this:
7. Save and deploy the Action, and add it to the Login flow.
The national registration number and the address will now be available in the ID token generated by Auth0 upon successful authentication:
Test the connection
Once you’ve completed the enterprise connection setup, you can test the login flow directly from the Auth0 dashboard to ensure it all works as intended.
To test the connection, return to the list of all OpenID Connect connections and find the one you created. Select the Try button from the More Options menu on the right.
Log in with itsme® (you’ll need a test user) and wait for the “It Works!” page with the list of claims. Auth0 will simulate the authentication flow and display the User Profile upon successful authentication. If everything works correctly, you’ll see address and nationalnumber claims added via the custom Action.

All set!
We've successfully configured the integration between Auth0 and itsme® through Criipto Verify. It’s now ready to be implemented within your website or application.
3. Integrate your application with Auth0
The exact method for integrating your application with Auth0 depends on your technology stack. It’s a straightforward process, and you can refer to the quickstart guides and other developer resources provided by Auth0.
Summary
Criipto Verify makes it a breeze to bring itsme® into your Auth0 ecosystem.
We also offer a range of other European eIDs and unlimited test logins when you sign up for a free developer account.
Have any questions or need assistance with integration? Don’t hesitate to reach out by email or on Slack, and our team will be delighted to help.
Author


