If you want to add Norwegian BankID to your application and are already using Auth0 as your authentication solution, this guide is for you.
The new Norwegian BankID app with biometrics is gaining momentum. It’s on track to fully replace its predecessor in the upcoming months.
The new app makes the login process much faster and more secure, resulting in a record number of downloads. As a business owner, you’re probably interested in offering your users an efficient and secure authentication via Norwegian BankID.
You can easily do this with Criipto!
In this blog post, you’ll find a step-by-step guide to configuring your Auth0 application to work with the new Norwegian BankID app via Criipto Verify. The integration is straightforward and involves just a few steps. Once it’s done, your users will experience a smooth and more efficient login process.
Let’s dive in.
3 Steps to Configure Norwegian BankID Logins
Integrating the Norwegian BankID with Auth0 via Criipto Verify takes 3 steps:
- Create a new application for your Auth0 tenant in Criipto Verify.
- Add a new connection for Norwegian BankID in your Auth0 application.
- Integrate your web or mobile application with Auth0.
1. Create a new application for your Auth0 tenant in Criipto Verify
First, you’ll need to create a new application in Criipto Verify.
From the Applications section of your Criipto Dashboard, click Add Login Application. Once the application is created, you will see its details on the dashboard.
You will need the following information to integrate with Auth0:
- Client ID to identify your Auth0 tenant to Criipto Verify.
(For example, urn:criipto:samples:NObankID) - Domain on which you’ll communicate with Criipto Verify. (We will use samples.criipto.id)
- Client secret is needed if you choose the Back Channel approach (recommended).
Configure the OAuth2 code flow
Once you’ve created and saved your application, you can configure the OAuth2 code flow. We strongly recommend this for security reasons.
Open your application and go to the OpenID Connect tab.
- Enable OAuth2 code flow.
- Copy the generated client secret.
- Set the user info response strategy to plainJson to enable retrieval of plain JSON user information from the /oauth2/userinfo endpoint.
Please note that the actual value of the client secret will only be revealed once, at this time. Criipto only stores the client secret as a hashed value, which means you can’t retrieve the value once it has been generated and stored.
2. Add a new connection for Norwegian BankID to your Auth0 application.
Go to your Auth0 account and create a new application (if you don’t already have one).
We’re now ready to add an OpenID Connect to establish communication between Auth0 and Criipto Verify.
The metadata endpoint we’ll use to configure the connection is as follows:
https://samples.criipto.id/dXJuOmdybjphdXRobjpubzpiYW5raWQ6c3Vic3RhbnRpYWw=/.well-known/openid-configuration
Here, samples.criipto.id is our Criipto test domain and dXJuOmdybjphdXRobjpubzpiYW5raWQ6c3Vic3RhbnRpYWw= specifies the Norwegian BankID biometrics as the login method.
Let’s take a closer look at what is happening here and why.
In most cases, the 'acr_values' parameter is used to specify which eIDs are being requested in the /authorize request to Criipto Verify. But since Auth0 will not pass acr_values to Criipto Verify, you’ll need to create a new Auth0 connection for every eID you intend to use.
In this case, you can leverage a login-method specific metadata endpoint: the OpenID Connect discovery endpoint with the above syntax. It contains an embedded and base64-encoded variant of the "raw" value normally contained in the acr_values. The acr_values parameter for the Norwegian BankID with biometrics is urn:grn:authn:no:bankid:substantial, which translates to dXJuOmdybjphdXRobjpubzpiYW5raWQ6c3Vic3RhbnRpYWw= in base64.
We will use this metadata endpoint as the Issuer URL when creating a connection for Norwegian BankID in Auth0.
Note: We will only configure the Norwegian BankID in this tutorial. If you plan to add more eIDs to your application, please refer to our full documentation for the list of supported eIDs and their corresponding acr_values.
Creating an OpenID Connect connection with Norwegian BankID
*The following steps are accurate at the time of writing but may change as Auth0's interface and features evolve.
On your Auth0 dashboard, go to Authentication, then Enterprise.
- Select OpenID Connect and create a new connection.
- Enter the Connection name you’d like to use (e.g. “Criipto” or “NOBankID”).
- Under Issuer URL, enter the login-method specific URL, as discussed above: https://samples.criipto.id/dXJuOmdybjphdXRobjpubzpiYW5raWQ=/.well-known/openid-configuration. (Remember to use your own domain in place of samples.criipto.id.)
- Under Client ID, enter the Client ID/Realm from your Criipto Verify application.
- Copy the Callback URL. Switch to your Criipto dashboard, and paste the Callback URL from Auth0 into your Criipto Verify application under Callback URLs.
- Go back to Auth0 and click on the Create button.
- After the application is created, choose Front Channel or Back Channel as a Type (depending on how you intend to integrate it with your application). You should only choose Front Channel if you are developing a pure Single Page Application. Otherwise, choose Back Channel. If you choose Back Channel, enter the Client Secret generated by Criipto Verify when you enabled the OAuth2 Code Flow.
- Save changes.
Make sure to enable the created connection for your Auth0 application. You can do this from the Applications tab of the connection you just created or directly from your Auth0 application.
Mapping Criipto claims to Auth0 claims
After you enable the connection, standard claims provided by Criipto via Norwegian BankID will become available in Auth0 User Profile by default. Standard claims include basic user information such as name and birthdate. They will be visible in the User Profile upon successful authentication. There’s no need for extra configuration in this case.
Some applications may need additional information provided by Criipto via BankID. If your application requires details like physical address, email, phone, or social security number (SSN) – you can request these from your users at the time of login and then add custom claims to the Auth0 ID token. A custom claim can be created by adding an Auth0 Rule to the login flow.
Even though Auth0 Rules are set to be replaced by Actions, we will show an example using rules. (Unfortunately, at the time of writing, Auth0 Actions do not expose user data from external identity providers. We hope this limitation is resolved in the near future.)
Adding a custom claim for SSN(fødselsnummer)
You’ll first need to configure Criipto Verify to require SSN via Norwegian BankID. Then, create an Auth0 Rule to add a custom claim to an ID token.
First, configure the required information from Criipto Dashboard:
- Go to Identity Sources and choose NO BankID.
- Switch the toggle to Require SSN (fødselsnummer).
- Save the changes.
Please note that your Criipto application should be configured to use static scopes. You can check this configuration in the General tab of your application.
Second, add a new rule from Auth0 Dashboard:
- From the main menu, choose Auth Pipeline, then Rules.
- Create a new rule using the Empty rule template.
- Choose a name for the Rule (e.g. Add SSN to ID Token.)
Add the following script, optionally replacing “https:/example.com” with your own namespace:
For Norwegian BankID, the SSN number will be available as socialno, so we can access it here as user.socialno.
4. After adding the script, click Save Changes.
5. Make sure the Rule is enabled for your login flow: You can check this in Actions >
Flows > Login, or by checking that the Rule toggle is enabled.
That’s it!
We have now added a custom claim that will be available in the User Profile as
https:/example.com/ssn when a user logs in with their BankID mobile app.
Adding custom claims for address, email, and phone number
You can also follow the above process to add physical address, email, and phone number to the Auth0 User Profile.
Just enable request for the necessary data from Criipto Dashboard, then create an Auth0 Rule to add a custom claim.
For the full list of available claims with the Norwegian BankID, please refer to our documentation.
Test the connection
After creating an enterprise connection for Norwegian BankID and configuring custom claims (where necessary), we can run the login flow directly from the Auth0 dashboard to make sure everything works as expected.
To test the connection, go back to the list of all OpenID Connect connections and find the connection you created. Select the Try button from the More Options menu on the right.
Log in with the Norwegian BankID and wait for the “It Works!” page that shows the result. Auth0 will simulate the authentication flow and display the User Profile upon successful authentication.
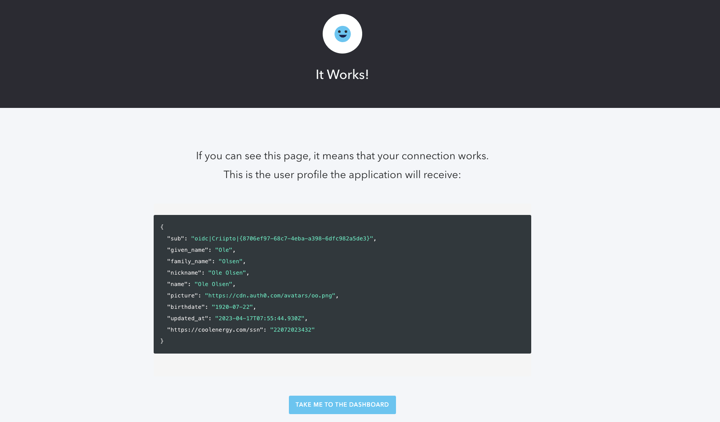
Great job!
You have successfully configured the integration of Auth0 with Norwegian BankID through Criipto Verify. The integration is now ready to be incorporated into a website or application.
For development and testing, you can create test users and get access to the test version of the new Norwegian BankID app with biometrics. If you need detailed information on how to do this, please refer to our documentation or feel free to contact us for any assistance!
3. Integrate your application with Auth0
The exact way you’ll integrate your application with Auth0 depends on the technology you’re working with. It is a straightforward process, and you can find helpful quickstart guides for the technology of your choice. Auth0 also provides sample apps for testing your integration before going live.
Once the integration is complete, your users will enjoy a streamlined authentication process that is both secure and convenient.
Take a look at just how easy and smooth the login flow is in this sample React SPA when a user logs in with their Norwegian BankID app with biometrics:
Simple integration for improved user experience
Integrating Norwegian BankID with Auth0 through Criipto Verify is a simple and straightforward process. Follow the above steps to easily configure your Auth0 tenant to communicate with Criipto Verify and offer your users a secure and seamless authentication.
If you want to learn more about testing Criipto, read our step-by-step guide.
Don't hesitate to get in touch if you have any questions or need assistance with the integration – we are here to help.
Author


