As more businesses move their operations online, it’s essential to ensure that only authorized personnel can access sensitive data and systems. That’s where identity management solutions come in. Okta is a well-known identity management solution that provides a single platform for handling user identities and access to applications.
But in some cases, organizations may want to provide users with additional authentication methods, such as national eIDs. Criipto Verify enables authentication via a number of eIDs, including the new Norwegian BankID with biometrics.
In today’s blog post, we’ll take a look at integrating Okta with Norwegian BankID via Criipto. We’ll also showcase the effortless login experience made possible by the new Norwegian BankID.
Integrating Norwegian BankID with Okta through Criipto Verify
When you add an external Identity Provider to Okta, Okta acts as an intermediary between your application and the Identity Provider that verifies your users' identities. This lets your users log in to your application using their credentials from that specific Identity Provider.
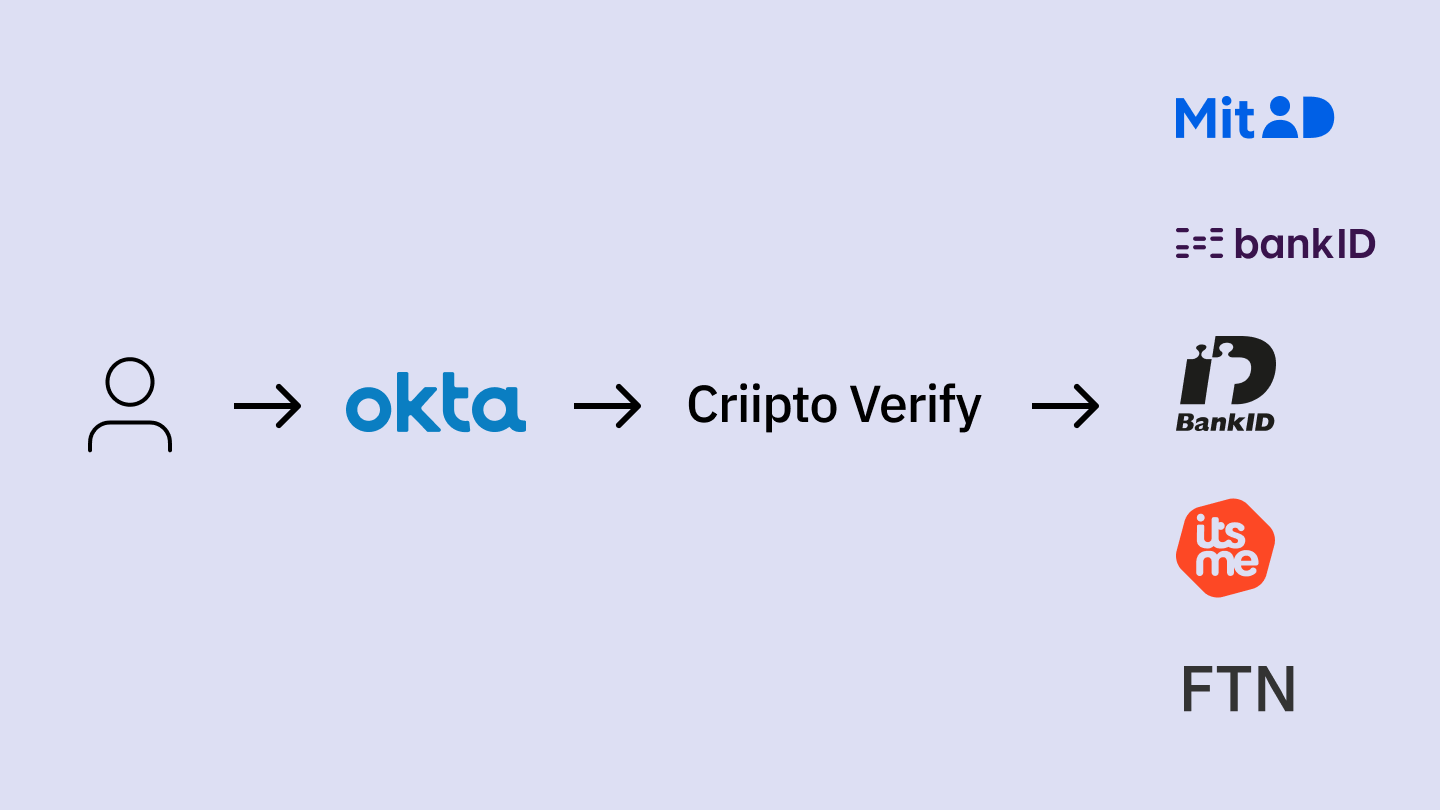
We’ll add a Norwegian BankID connection to Okta to give end users the option to use their national eID for authentication. The login flow will start with Okta, and the user will be able to choose to log in with their Norwegian BankID. They’ll be redirected for authentication and complete the login process with their BankID app. After successful authentication, a user account will be created in Okta, and the user will be sent back to your application along with an ID token.
Using Criipto to integrate Norwegian BankID with Okta requires the following 4 steps:
- Register your Okta tenant in Criipto Verify
- Configure OAuth2 flow in Criipto Verify
- Create Criipto Verify identity provider in Okta
- Integrate your application with Okta
If you want to follow along, we recommend having both Criipto and Okta's management dashboards open simultaneously, as the setup requires some switching between the two.
Prerequisites
Before you get started, you’ll need the following information from Okta:
- The callback URL for your Okta tenant. This will depend on the DNS name you use in Okta for running your logins. The value may look something like https://your-company-name.okta.com/oauth2/v1/authorize/callback, but check your Okta settings to make sure.
- [Optional] The post_logout_redirect_url for your Okta tenant.
1. Register your Okta tenant in Criipto Verify
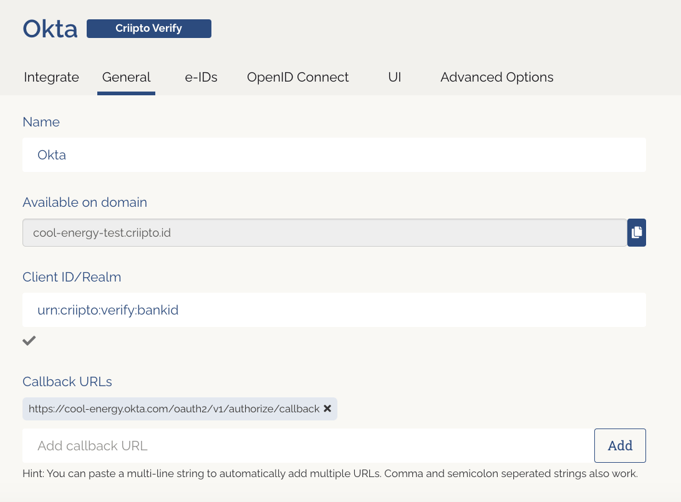
First, register your Okta tenant as an application in Criipto Verify.
Once registered, you’ll need to retrieve some information from the application settings in the Criipto dashboard. You’ll need the following details to integrate with Okta:
- Client ID to identify your Okta tenant to Criipto Verify. We chose
urn:criipto:verify:bankid - Domain on which you will communicate with Criipto Verify. It can be for example,
your-company-name.criipto.id.We'll usecool-energy-test.criipto.idas an example. - Client secret which Okta needs to fetch the actual user information from Criipto Verify during login. The secret is generated and copied as described further down.
If you plan to use single sign-on (SSO), you should also register your Okta post_logout_redirect_url here in order to run single logouts.
2. Configure the OAuth2 code flow
Once you save your application, follow these steps to configure the OAuth2 code flow:
- Enable OAuth2 code flow.
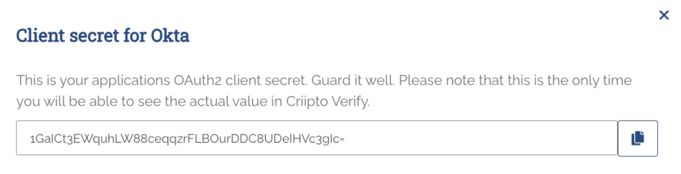
- Copy the generated client secret.
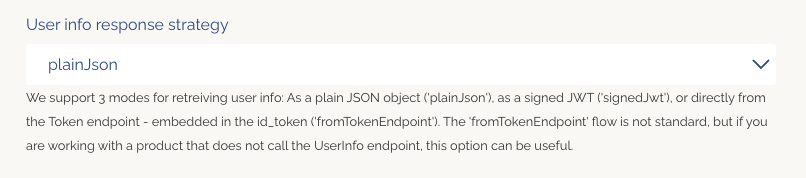
- Set the user info response strategy to
plainJsonto enable retrieval of plain JSON user information from the/oauth2/userinfoendpoint.
* Please note that this is the only time you’ll see the actual value of the client secret. Criipto stores the secret as a hashed value, so you cannot retrieve it after it has been generated and stored.
3. Create Criipto Verify identity provider in Okta
- From Okta dashboard, go to Security > Identity Providers.
- Click Add Identity Provider and select OpenID Connect IdP.
- Fill in the form values to configure the OpenID Connect IdP (see the example below).
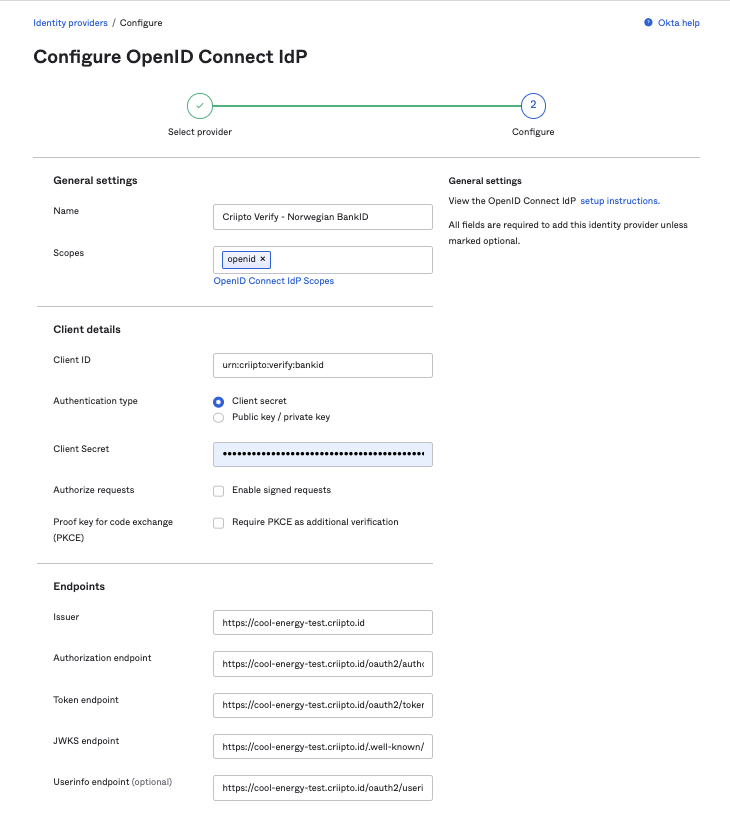
Assuming that your Criipto Verify domain is cool-energy-test.criipto.id, you should add:
- The Name in the General Settings is entirely up to you. We chose Criipto Verify - Norwegian BankID.
- Scopes:
openidwill suffice. - Client ID is the Client ID/Realm from the Criipto Verify application you created in Step 1. In our case,
urn:criipto:verify:bankid - Client Secret is the secret generated by Criipto Verify during the OAuth code flow setup.
- Issuer:
https://cool-energy-test.criipto.id - Authorization endpoint:
https://cool-energy-test.criipto.id/oauth2/authorize?acr_values=urn:grn:authn:no:bankid:substantial - Token endpoint:
https://cool-energy-test.criipto.id/oauth2/token - JWKS endpoint:
https://cool-energy-test.criipto.id/.well-known/jwks - Userinfo endpoint:
https://cool-energy-test.criipto.id/oauth2/userinfo
Notice that we have provided acr_values for Norwegian BankID in the Authorization endpoint URL. If you’re setting up multiple eIDs, you’ll need to create a new OIDC Identity Provider with the corresponding acr_values for each of them.
You can find the list of supported eIDs and their corresponding acr_values in our documentation.
4. Integrate your application with Okta
The method of integrating your application with Okta depends on the technology you are working with. For detailed instructions, please refer to the Okta developer documentation.
To quickly test the integration, we used this sample React application provided by Okta. The Okta-hosted login example in combination with the Routing rule configured from Okta dashboard and appropriate claims mapping let us simulate the login flow and verify that the integration was successful.
Watch a video demonstration of the login flow below:
Summing-up
Integrating Norwegian BankID with Okta through Criipto offers organizations a simple and secure way to provide users with an additional authentication method. It can enhance the security of enterprise resources, simplify the login process for users, and help you comply with local regulations.
If you want to learn more about testing Criipto, read our step-by-step guide.
If you have any questions about the integration process or need further assistance, please don't hesitate to contact our support team on Slack or by email – we’re here to help!
Author


