Table of contents
Author


Fiddler by Telerik is a powerful tool used to monitor and analyze HTTP network traffic.
Positioned between the web server and the client application, it acts as a web proxy. So all HTTP(S) requests are routed through Fiddler before proceeding to their destinations. Likewise, HTTP(S) responses only return to the calling application after first passing through Fiddler. As a result, we get a comprehensive trace of all web traffic on a given machine.
Fiddler is exceptionally useful for troubleshooting and testing. It’s also completely tech-agnostic and can be used for web, desktop, and mobile applications.
Unsurprisingly, Fiddler is very handy for debugging authentication flows.
That’s what today’s post is about. Here’s what we’ll cover:
- How to interpret the network trace
- What to expect in a properly configured authentication flow
- Common pitfalls that might require attention.
We hope this helps developers troubleshoot issues when implementing federated authentication with OpenID Connect via Criipto.
We'll be using Fiddler Everywhere for Mac, but Windows users can get the same functionality with Fiddler Classic.
The basics of federated authentication flow
Federated authentication flows always involve three parties:
- The Identity Provider (IdP)
- The Relying Party (the calling application)
- User agent (e.g. a browser)
When issues arise, the trickiest part is often to determine which of the three is responsible. Fiddler can greatly assist with this by providing a detailed record of interactions between the three entities.
The specific sequence of interactions in the authentication process depends on the protocol used. In our case, it’s OAuth2 and OpenID Connect. The selected grant type ( Authorization Code flow or PKCE) will also introduce slight variations.
1. Authorization code grant
In this grant, the user’s browser makes an authorize request to the web application and receives an authorization code in return. The web application then contacts the Identity Provider to exchange the authorization code for a token.
Typically used in traditional server-based applications, this grant type involves server-side execution. Therefore, to capture a complete network trace, Fiddler should be running on the server that is performing the authentication (we’ll demonstrate this later in the article).
2. PKCE
An extension of the Authorization Code grant, PKCE introduces an additional layer of security and is recognized as the best practice for implementing authentication in public clients, such as mobile and single-page applications.
In this flow, a unique secret, known as a “code verifier,” is incorporated into the authorize request. The authorization server responds with a code challenge–a hashed version of the code verifier. To obtain a token, the client must provide both the code and the code verifier during the code-for-token exchange.
If your application is using PKCE for authentication, you'll see a code_verifier parameter in the API call when the code exchange is performed.
Getting started with Fiddler
If you’re new to Fiddler, here is a simple guide to get you started.
Capturing HTTPS traffic
By default, Fiddler only captures non-secure HTTP traffic, excluding encrypted HTTPS requests.
Since most traffic nowadays is HTTPS, you’ll likely want to configure Fiddler to decrypt it. You can achieve this by either:
- Installing Fiddler's root certificate on your machine: Follow the steps outlined in the official guide to do so.
- Using a Preconfigured Browser Capturing feature: This doesn’t require extra configurations.
Once you choose the option that suits you best, you're ready to inspect the authentication flow.
Starting Fiddler Capture
- Launch Fiddler Everywhere.
- Enable the System Proxy toggle (if you have the Fiddler root certificate trusted) or use the Browser Capturing Mode.

- Navigate to your app or website, and run the authentication flow. The Fiddler console will show all of the browser actions involved in the authentication flow, letting you inspect each request and response.
- Once you complete the authentication flow, turn off the System Proxy toggle (if it was enabled).
- You can now inspect the captured network trace.
The happy path
Let’s analyze a network trace of a simple React application that lets a user log in with an electronic identity (eID). We’ll use the Cool Energy demo app for demonstration.
Follow along if you’d like!
Let’s start by launching Fiddler. We’ll leverage the Browser feature to isolate the network trace to a specific browser process. In the newly opened browser window, navigate to the app: https://demo-cool-energy-react.netlify.app/.
We’ll now act as an end user and log in with an eID.
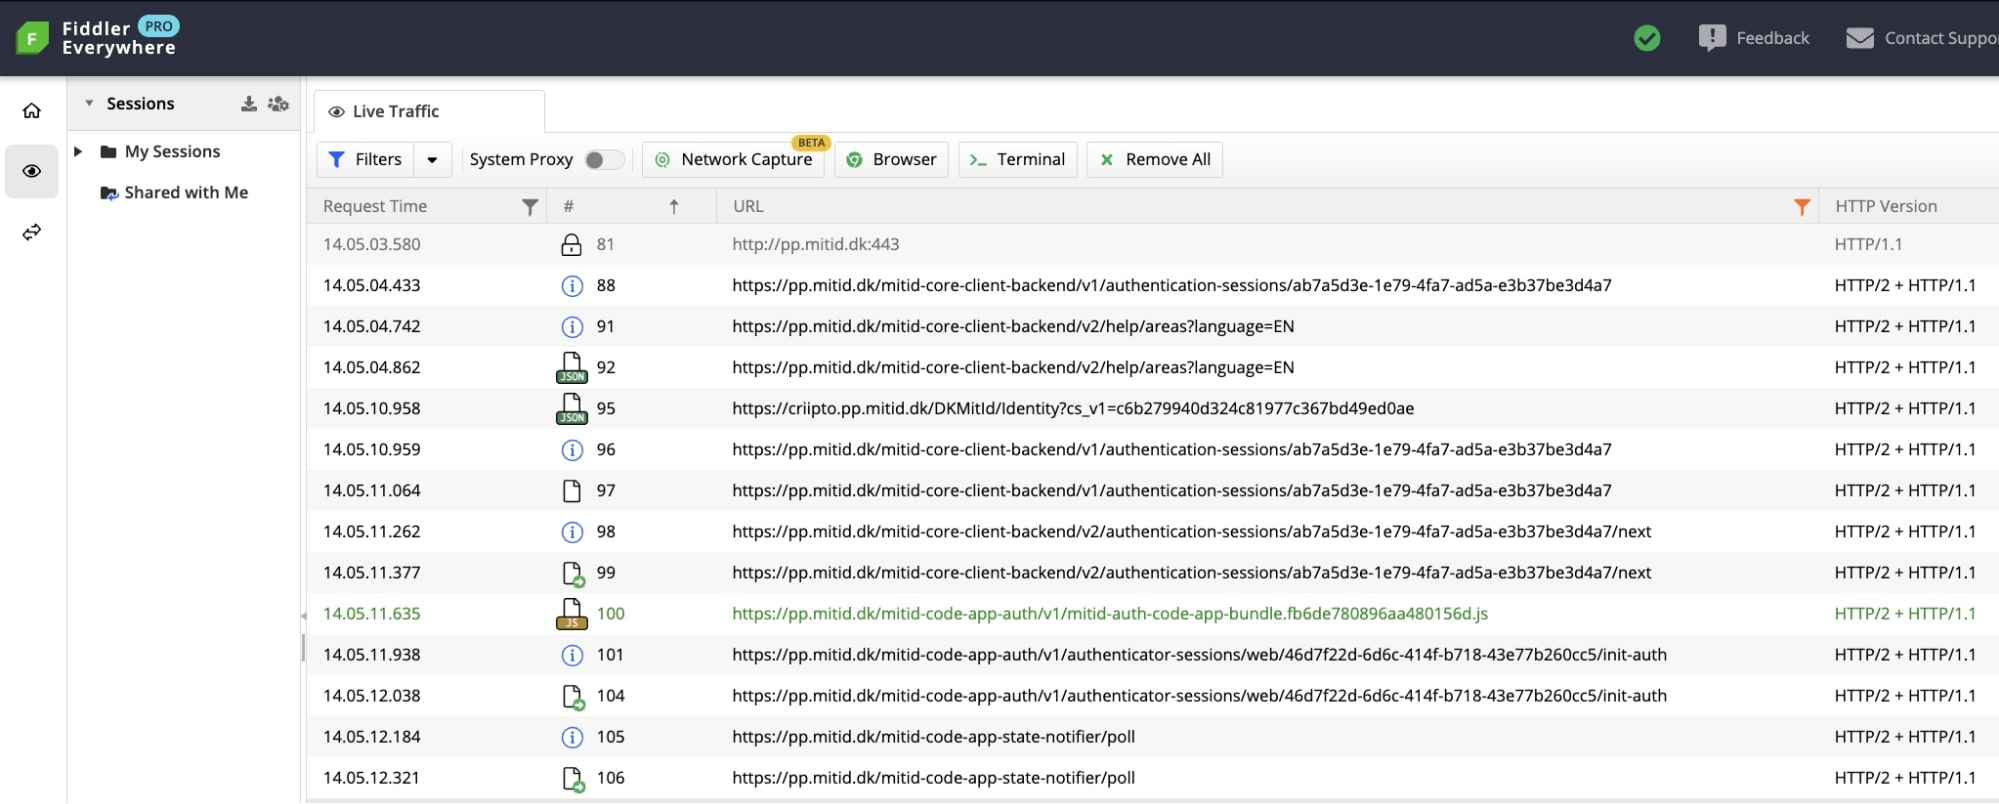
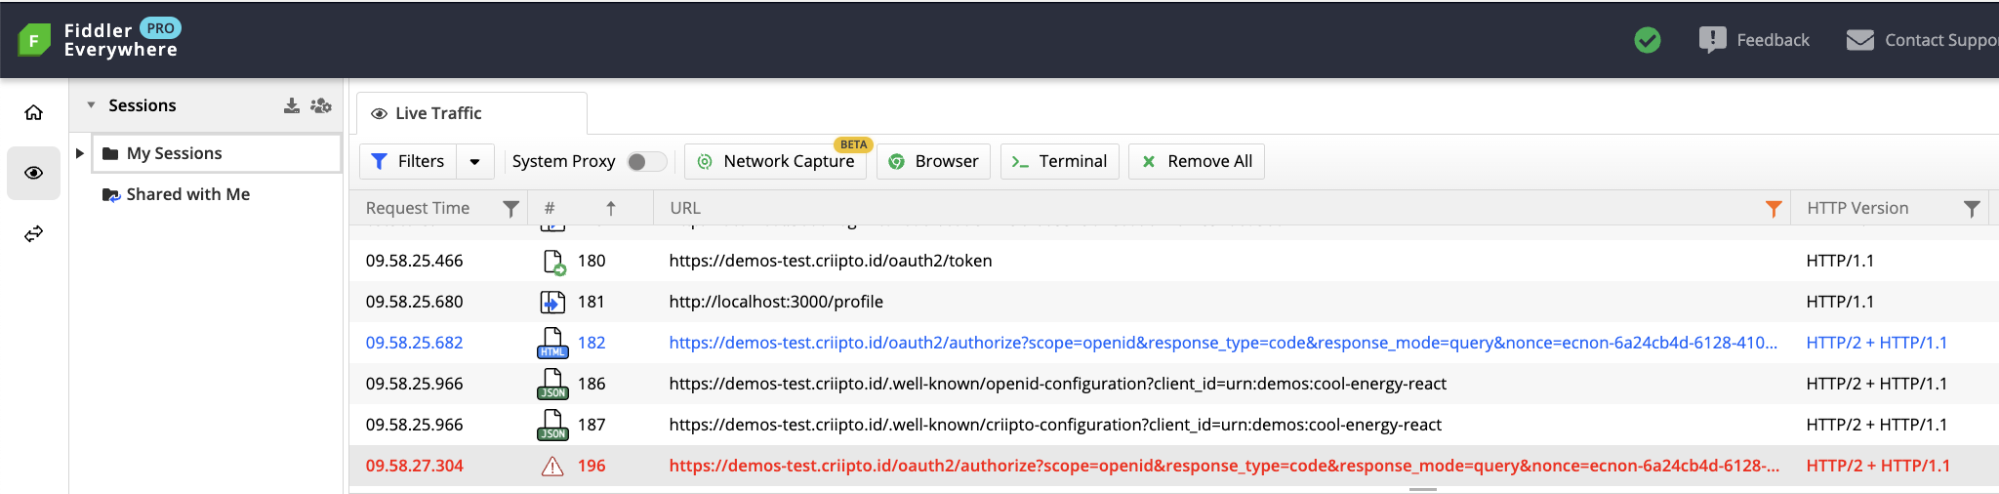
Below is a detailed breakdown of the process, accompanied by a network trace captured by Fiddler.
* We’re applying filters to display the requests relevant to the authentication flow. If you follow along, you’ll see additional requests (e.g. font files, images etc.)
- We navigate to the login page of the application, then initiate the login process by selecting an eID option. We’ll go with MitID. The “Login with MitID” button takes us to the authorize URL with a set of parameters.
* Authorize URLs follow this structure: /oauth2/authorize
- We complete the authentication with MitID (using a MitID test user). This triggers several requests to the Identity Provider, including calls to criipto.pp.mitid.dk and pp.mitid.dk.
- Upon successful authentication we’re redirected back to our domain at Criipto:
https://demos-test.criipto.id/DKMitId/Callback?cs_v1=c6b279940d324c81977c367bd49ed0ae&code=40d0c7dd-d574-45eb-89d2-f5d9b075d1a2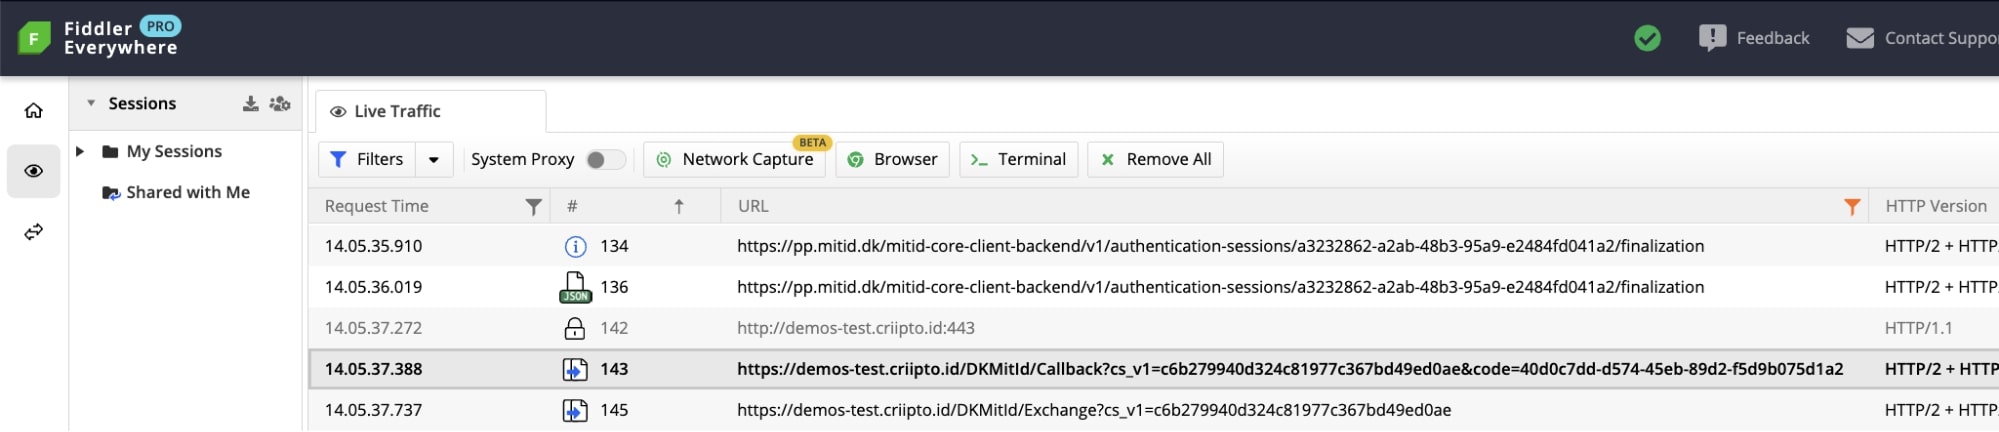
- Another redirect takes us to the callback URL of the client application. Notice the code parameter: This is the authorization code. https://demo-cool-energy-react.netlify.app/login?code=7f4959d095164568a1c6ac52d58947ee

- The authorization code is then exchanged for an id_token. This is done by posting the code from the previous step to the token endpoint: look for the /oauth2/token request in the network trace.
If you inspect the request body in the Fiddler console, you'll find a code_verifier among other parameters. This indicates a PKCE flow.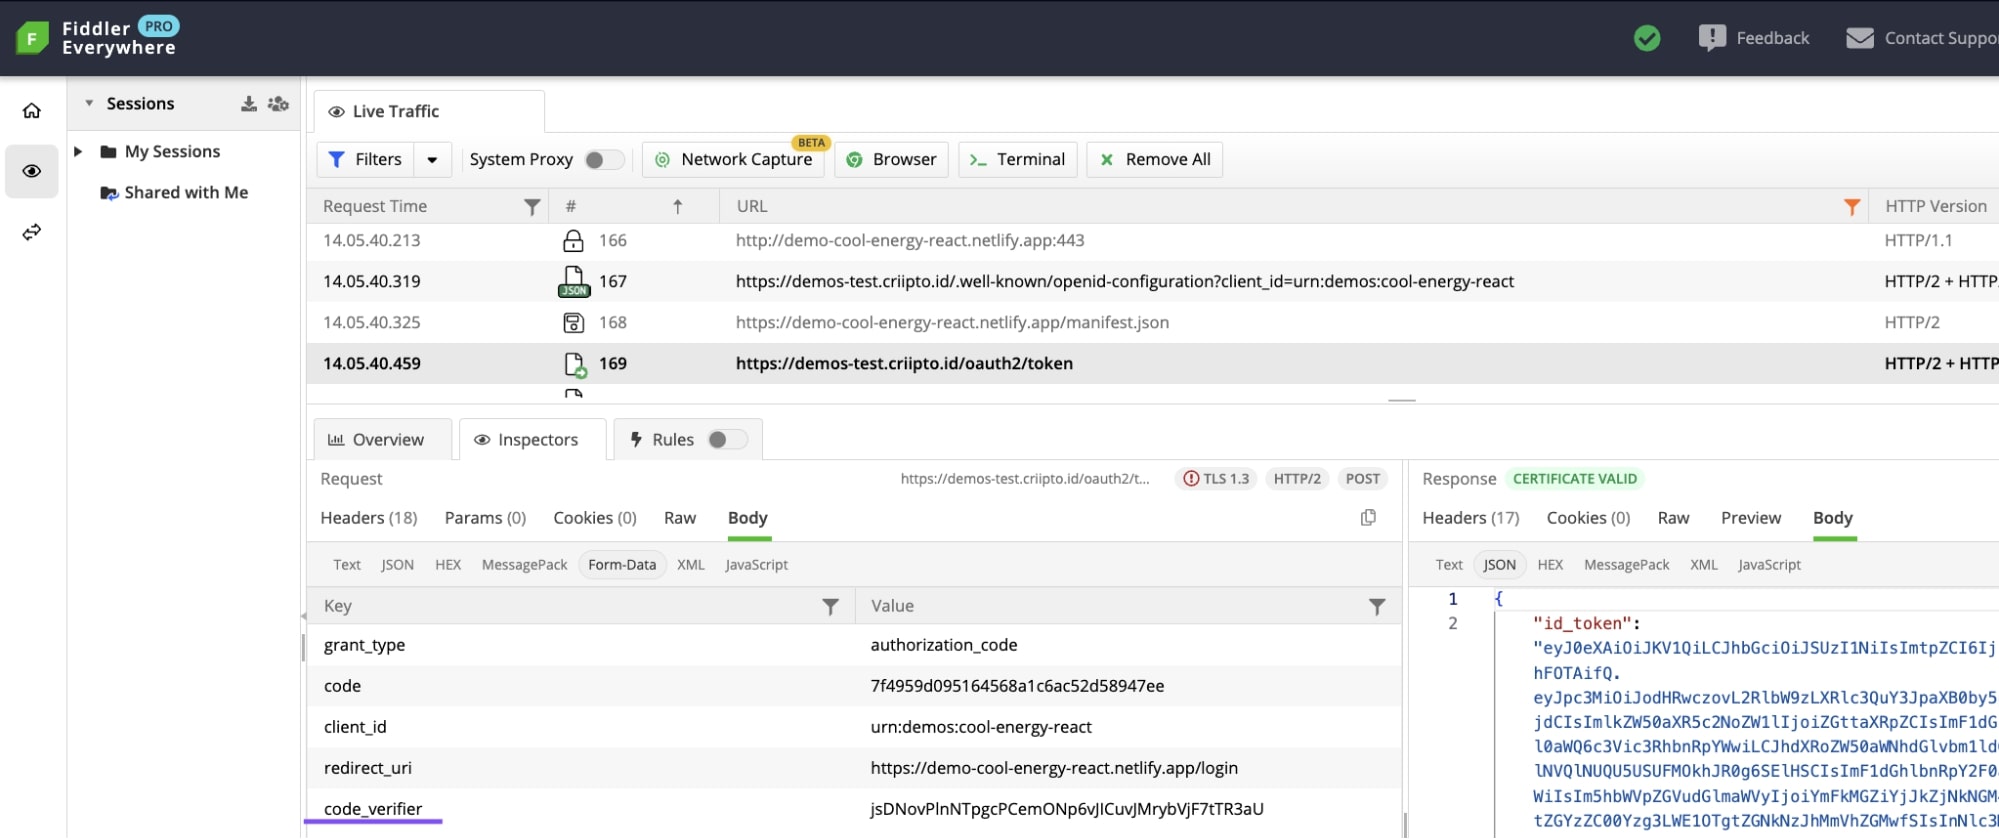
- After a successful code-for-token exchange, the authentication is complete.
The user is now logged in (and redirected to the dashboard), while the application has access to the user’s information in the form of JWT claims.
Troubleshooting authentication failures
It can be challenging to understand and resolve authentication failures, given that real-world authentication implementations are often far more intricate than the basic React SPA from our walkthrough.
Fortunately, a network trace can really help when the problem source isn't immediately obvious.
Let’s look at three common issues that lead to authentication failures, along with corresponding records from the network trace.
1. Mishandling sessions
Improper session management within the client application is a common stumbling block in authentication implementations. Sessions that are not correctly handled may result in e.g. a redirect loop.
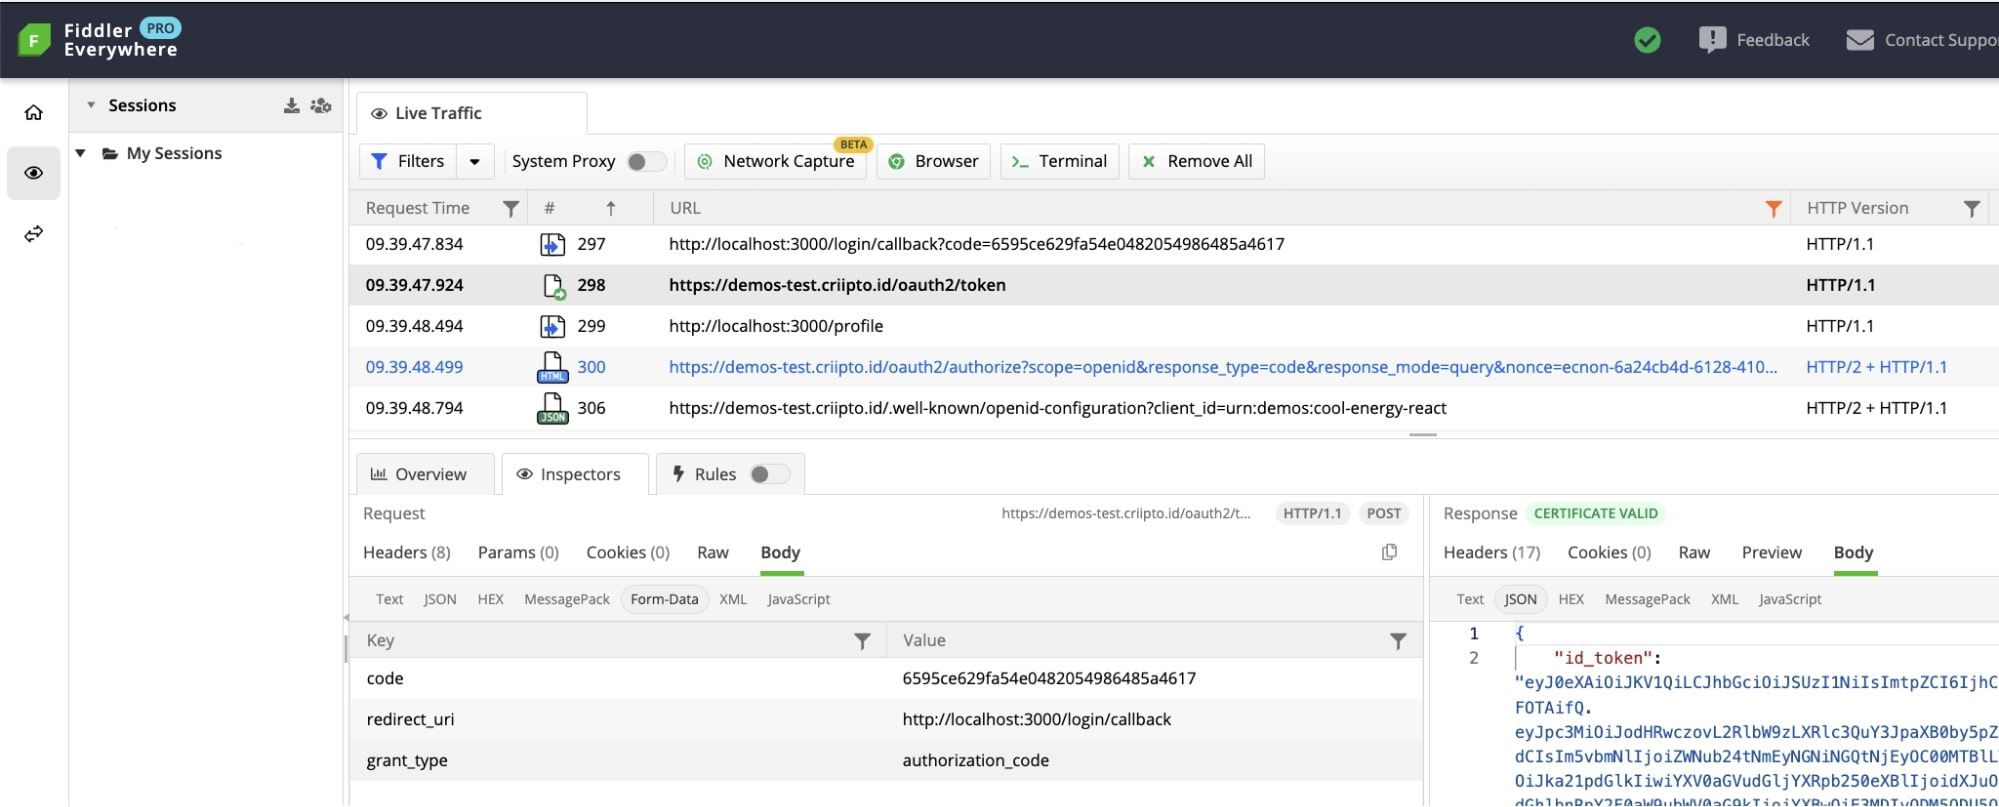
Consider a scenario with a Node.js + Express application where access to the /profile route is restricted to authenticated users. Unauthenticated users are redirected to start a login.
Let's assume an id_token is retrieved after a user logs in with an eID and used to create a session on the server with express-session.
The middleware is checking whether the user is logged in, yet there's an oversight in another section of the code: The user's details are not being saved in the session.
As a result, users are redirected to the login page after attempting to access the /profile route.
A Fiddler trace would show a code-for-token exchange indicating successful authentication, followed by a redirect to the authorize URL (which represents the /login route).
Additionally, if Single Sign-On (SSO) is enabled for your domain, this scenario can result in a redirect loop leading to a 429 error.
To fix this, you must ensure proper session management within your application (and remember to implement checks for token expiration).
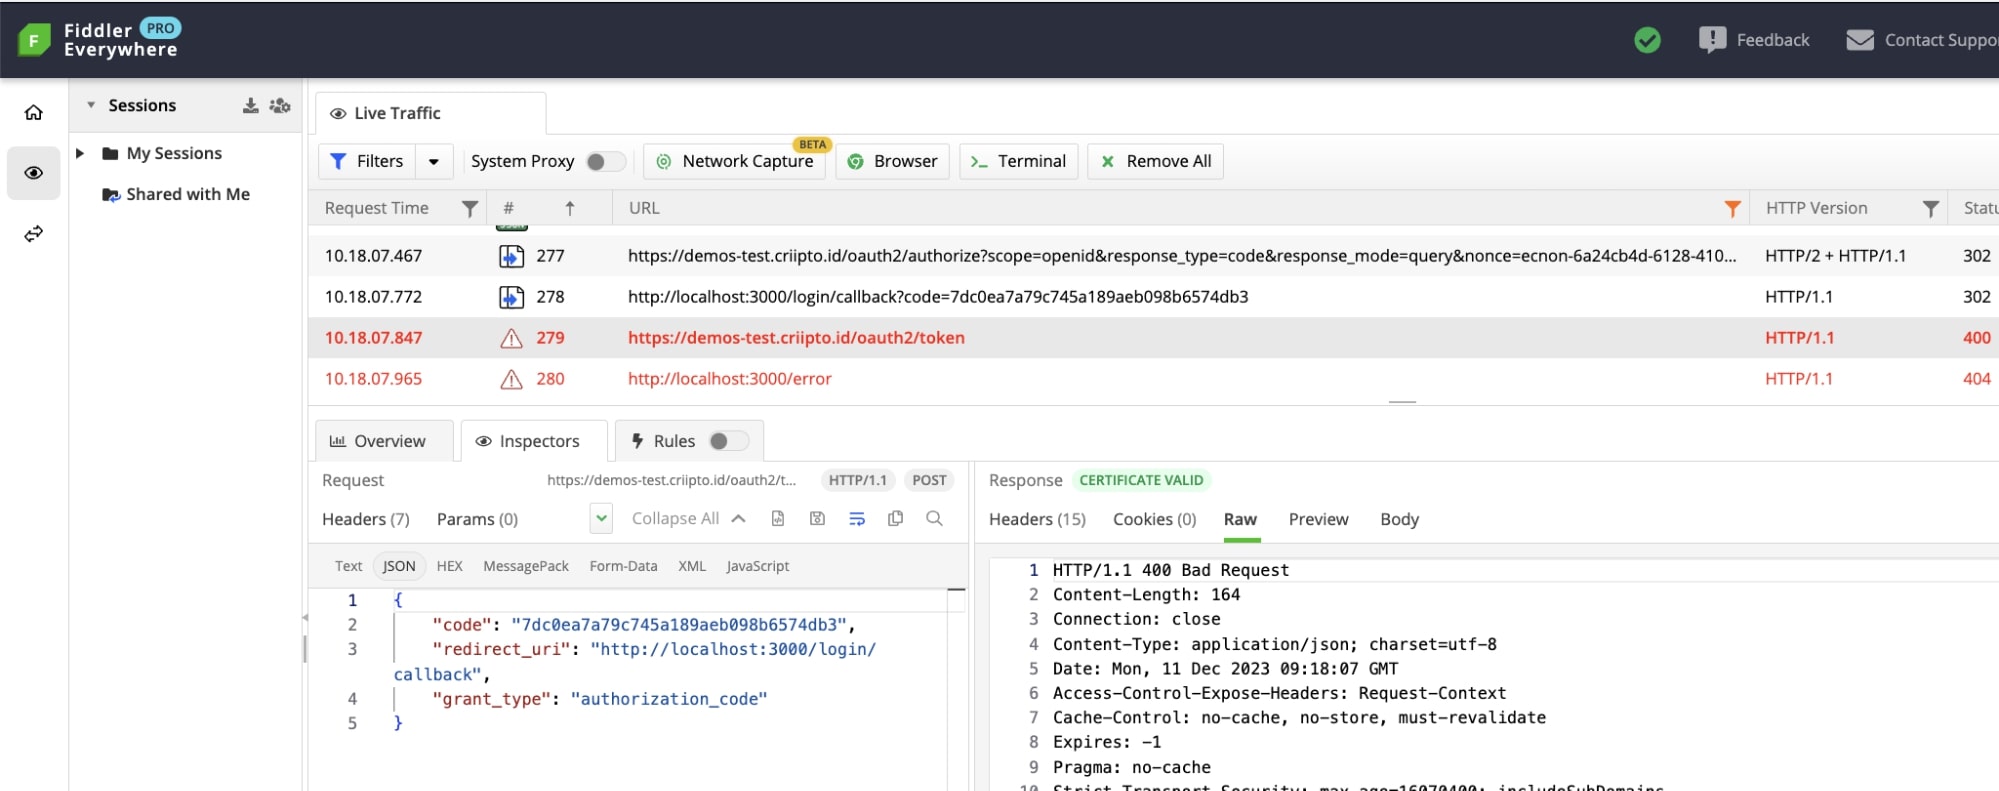
2. Code-for-token exchange not performed correctly
Criipto’s SDKs will handle the code-for-token exchange for you. We generally recommend choosing a reliable library that can manage this task. But of course, you can explore the option of building your own solution.
If you do so, you’ll notice that the call to exchange the authorization code for a token has to include the following parameters:
code = Authorization Code
client_id = <id of the client application>
redirect_uri = <URL where the authorization code should be returned to>
grant_type = authorization_code
You need to ensure that:
- client_id and redirect_uri are correct
- The authorization code hasn't been used before (each code is valid for a single use).
- The authorization code is not expired (they typically have a short lifespan).
Let’s use the Node.js + Express application from our previous example.
This time, say, we forget to send the client credentials along with the request:
In the Fiddler trace, we’ll see that the code-for-token exchange hasn’t been executed successfully:
* This trace was recorded using Fiddler’s Terminal Tracing mode. Since the app implements the Authorization code grant, the network trace should be recorded on the server performing authentication for the code exchange to show up in the network trace.

3. Multiple code exchanges
A code-for-token exchange should be executed only once for successful authentication.
If authentication is failing and you can’t immediately find the root cause, you may want to check that there is only one call to the token endpoint. Look for a URL with this path in the network trace: /oauth2/token.
Below is an example of a Fiddler trace demonstrating the issue. The following may happen when using Criipto’s React library in StrictMode.
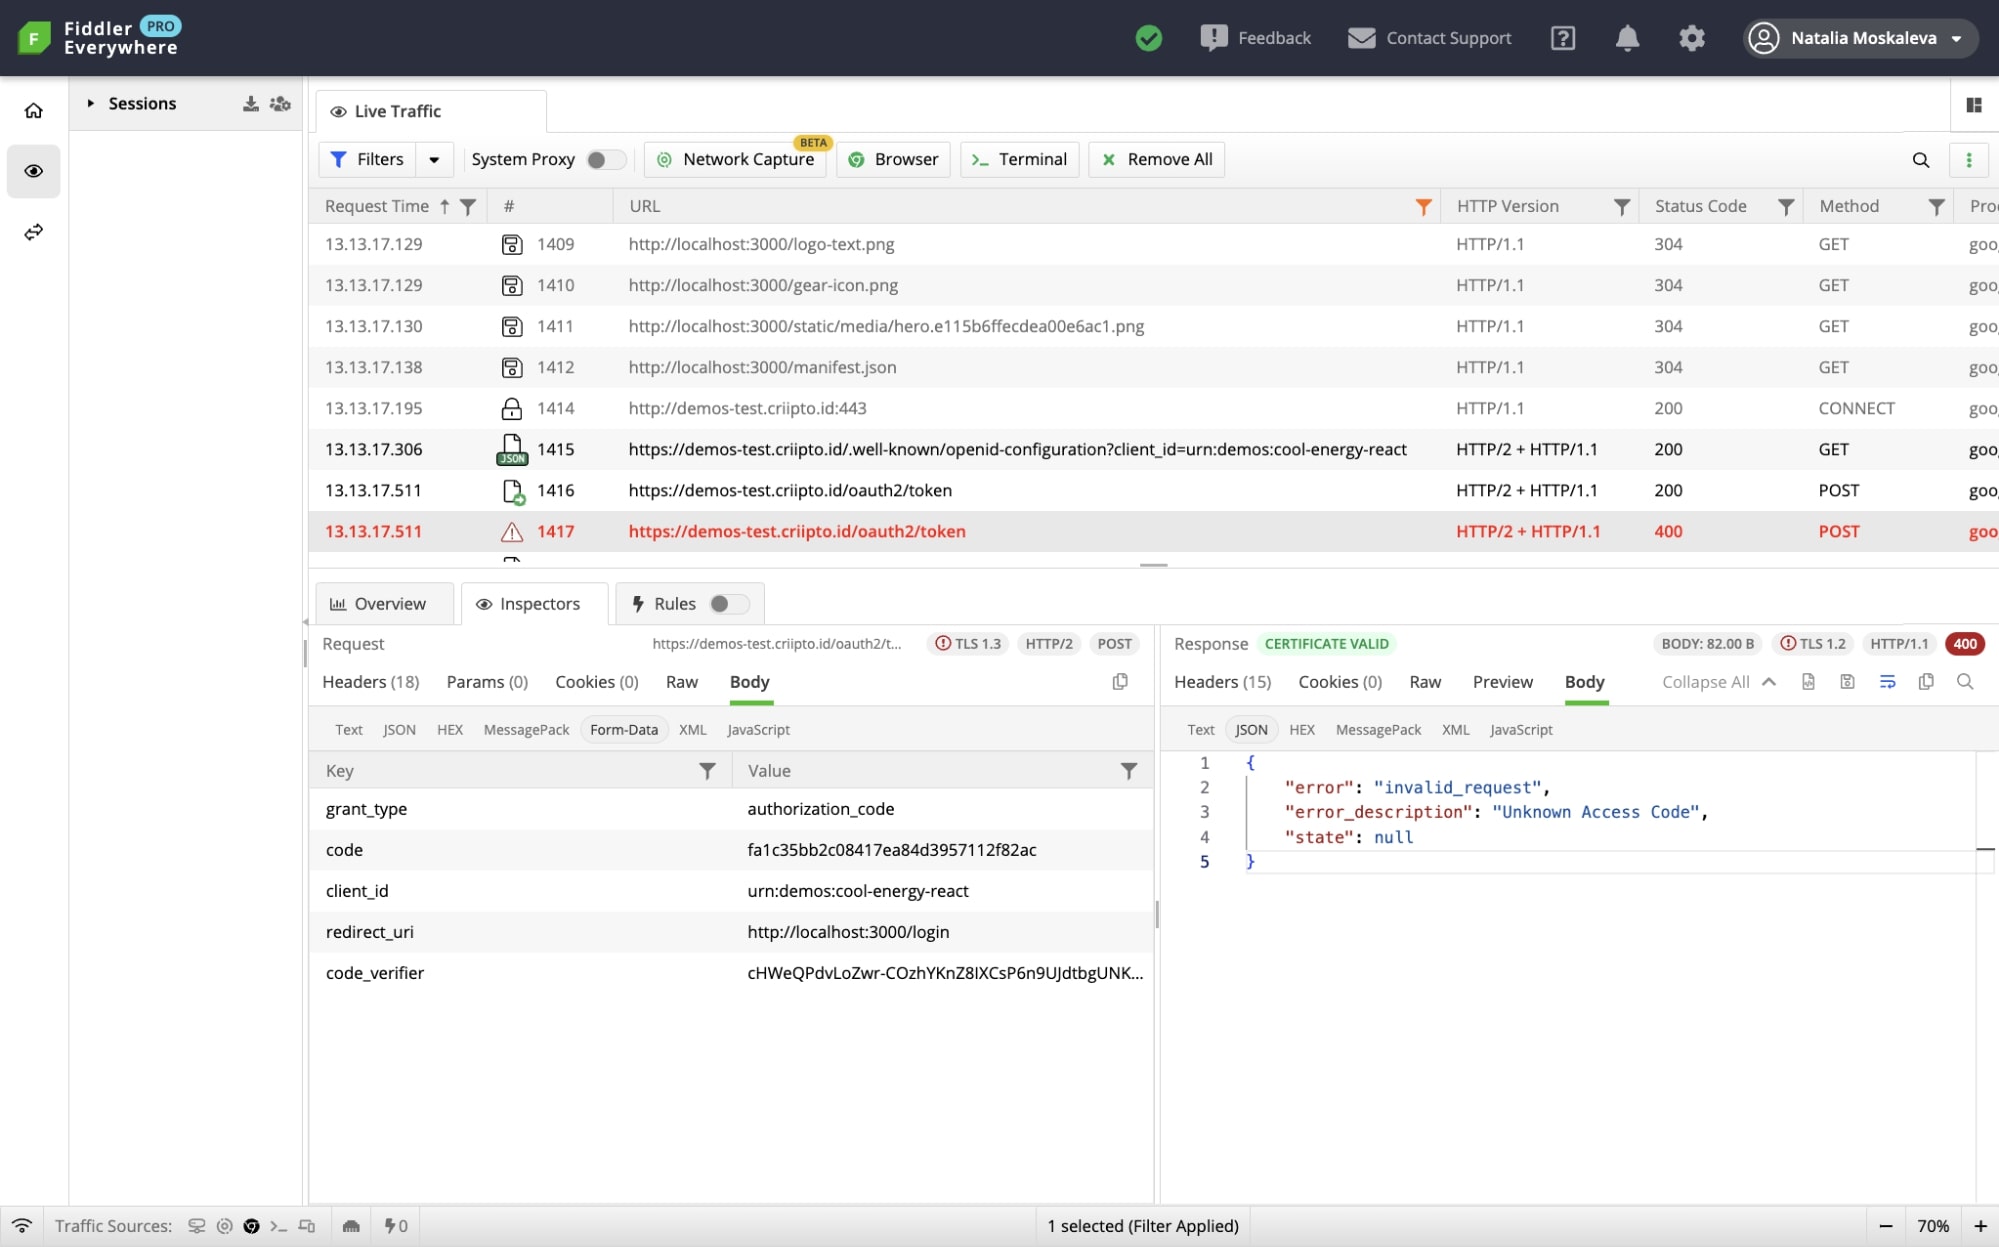
* This is the case as we execute side-effects in useEffect. For now, to address this, please move StrictMode down in the tree, so that it is inside the CriiptoVerifyProvider:
* The issue has been fixed in version 2.0.2.
Wrapping up
We’ve covered a few common issues, but there's much more to explore within authentication debugging.
So if you encounter challenges or have insights to share, don't hesitate to reach out.
We highly appreciate your feedback!
Author


